


Mosaic Tiles Installation Techniques – Are They Different from Normal Tiles?
Bored with your plain kitchen walls? Spice them up with some bright colours and patterned mosaics and make your kitchen a source of culinary inspiration! Transforming a plain wall into a contemporary and classy décor piece is also a great weekend DIY project especially during lockdowns.
Mosaics are made up of many small pieces of individual glass, tiles, stones, or metals that have been mounted onto a sheet or net of 300mm x 300mm. Installing mosaic tiles is just like any other tile installation, just on a smaller scale – so the time you’d need to complete an installation project really depends on the size of the lay area and the complexity of the patterns you choose.
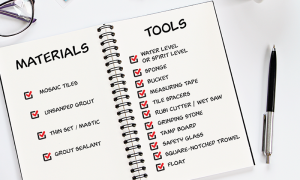
Before we start, you will need these tools and materials.
The very first step is finding out the measurements of your installation area to get the exact quantity of mosaic tiles needed. Measure your kitchen backsplash height from the top of the counter to the bottom end of the cabinet, and its width from the right to the left end.

Preparing the Wall
Once you have your mosaic tiles, these next steps will help you to prepare the wall. Be careful – actual tiling should not be done over wallpaper, glossy surfaces, lead paint, or plywood.
- To make sure that the installation is balanced and symmetrical from one end to the other, mark the centre point of the wall, and start laying the mosaic tiles from the inside out.
- The area between the range and vent hood is usually the largest space on the wall, so it usually serves as the starting point for installing the tile. Mark a centre line on the wall halfway between the cabinets and under the vent hood.
- Measure from the centreline to the cabinets. If you have to cut tiles to fit, move the centreline slightly so that you’ll only have to cut the mesh backing. Make sure to include a 3mm space in between each tile for the measurement calculations.
- Next, perform a dry lay of the mosaic tiles before the actual installation. This will help you visualise where and how the mosaic tiles are going to be placed, and helps to determine where you will need to cut the mosaic tiles to minimise mistakes.
- Before installing the mosaic tiles, clean up any grease splatters on the wall to ensure the adhesive will bond properly.
- Mask off the countertops and any upper cabinets that will have tile installed along the sides. Leave a gap of about 6mm to act as the perimeter joint between the wall and the tape for the tile.
- Turn off all wall power sockets and remove the cover plates.
Need Help?

Spreading The Adhesive
Once your wall is ready to be tiled, the next step is to spread the adhesive.
- If you are working on a new drywall, seal the walls with a skim coat (available from any hardware store) and let it dry completely. This is to level the wall surface.
- If you are tiling over a smooth surface, use a coarse-grit sanding sponge to rough up the surface. This will help the tile grip better. For wavy or uneven surfaces, you can spread a layer of setting-type joint compound to even up the surface.
- Choosing the adhesive:
- There are two choices when it comes to choosing the adhesive. Mastic and thin-set mortar are the two most commonly used adhesives for ceramic, porcelain, and glass tile installations.
- For a stronger hold, or if the application area is a wet area like a kitchen countertop, thin-set mortar would be a better choice.
- When it comes to vertical wall installation at dry or low moisture areas, we recommend the usage of mastic, which is easier to handle.
- Mix the thin-set mortar according to the manufacturer’s direction to reach a creamy peanut butter-like consistency.
- Apply the thin-set mixture to the wall with a notched trowel along the centreline. Use the flat side of the notched trowel to spread the mixture, then turn the trowel around to scrape the thin-set with the trowel at 45-degree angle, creating ridges of equal thickness. Remember not to spread too much at one time – work at small areas of about 0.2m2 at a time, as the thin-set dries rather quickly

Cutting The Tiles
Cut your tile sheets to the nearest full row to fit around the power sockets and fill the gaps with tiles cut on a wet saw or manual tile cutter (available at most home improvement or hardware stores). Grind or sand the cut edges to smoothen the edges for a better finished look and precise installation.
Installing The Mosaic Tiles
Similar to the dry laying process, start tiling from the centre marking, always starting with the bottom row. Press the tiles firmly in place and work one row at a time.
Use a straightedge to push the mosaic tiles slightly to make sure all rows are level. Occasionally, check your work to ensure that the mosaic tiles have fully bonded with the thin-set mortar.


Grouting
When you’re done installing the tiles, wait 24 hours before adding the grout.
- Mix the grout with water until it reaches mashed potato-like consistency, then put some on the wall with a grout float. Work the grout into the joints by moving the float diagonally over the tiles. Hold the grout float at a 45-degree angle to the tile. Scrape off any excess grout with the float after the joints are filled.
- Wipe the grout off the surface of the tiles with a damp sponge after 20 to 30 minutes of application. If the grout pulls out from the joint, wait another 10 minutes for it to harden. Continually rinse the sponge in a bucket of water and wipe the tiles until they are clean.
- Rake the grout out of the joints at the inside corners and along the bottom with a utility knife – you may fill that area with caulk later. Keep the dull side of the blade along the countertop. These perimeter joints allow the wall to move without cracking the grout.
- Wipe the haze off the mosaic tiles with microfiber cloths about two hours after grouting.
Applying Grout Sealer
- After seven (7) days, clean the mosaic tiles with soft cloth and mild detergent.
- Apply grout sealer to protect against stains.
And there you have it, your DIY mosaic tiles installation.


")


-100-min")


